ADVENTURE HIKES AND CANYONEERING
IN THE SOUTHWEST
© Christopher Earls Brennen
|
|---|

|
Hike K27. Picacho Peak
- Hiking time: 5.5 hours
- Estimated hiking distance: 1 mile
- Elevation gain: 1120 feet
- USGS Topo Map: Picacho Peak
- Difficulties: Some navigation in the desert with no water available; some technical rock climbing, including climbs up to the false summit block and rappels down the other side
- Special equipment: Full rock climbing gear, harnesses, helmets, rappel devices (ATC or figure eight), one 50ft rope, about 20ft webbing, a few slings, quickdraws, and carabiniers; hats, sunscreen and lots of water
-
ACA Rating: 4A III

Characteristics
The land in the far southeastern corner of California, near the town of Yuma, Arizona, is one of the starkest desert landscapes in the world. Little or nothing can grow naturally in this arid land where the Colorado struggles to avoid complete evaporation before entering Mexico and the Gulf of California. The landscape has been flattened by eons of Colorado floods, now, of course, controlled by a multitude of upstream dams. But sticking up out of this flat desert are majestic rock monoliths that began as volcanic plugs and have been carved into wonderful shapes by the endless erosion of wind and water. About twenty miles north of Yuma, just to the west of the Colorado stands the most spectacular of these sculptures, the thousand foot tall monolith known as Picacho Peak. This can easily be seen from thirty miles away, glinting in the bright desert sun. Even from that distance it looks impossible to climb with its vertical and sometimes overhanging sides and its great cracks and ledges. This impression is enhanced as you drive across the desert toward the monolith and begin to recognize just how huge it is. Yet the climb to the top is not too difficult except for the freak factor introduced by the awe-inspiring exposure.
Trailhead
From Interstate 8 about a mile west of Yuma, Arizona, take the freeway exit labelled "Winterhaven Fourth Avenue", cross over the Interstate and proceed north about a hundred yards to where you make a sharp right turn onto S24 following the signs for Picacho State Park. Continue east and then northeast on S24, passing under the railway and onto a long straight section past farms and homes. About 3.7mi from the freeway you continue straight on where S24 turns right. In a short distance the pavement ends and you proceed on a dirt road that climbs onto an embankment alongside a reservoir. The road turns sharply right onto a bridge and then right again at the other end of the bridge.
Though two-wheel-drive vehicles can continue on for many miles it would be wise to park them just off the road at some convenient point and consolidate in four-wheel-drive vehicles for the rest of the approach to Picacho Peak. From the bridge an excellent dirt road proceeds northwards for over 13mi to the entrance to the Picacho Mine on your left. Indeed, before you come to that entrance large hills of tailings will be evident on your left. All are surrounded by barbed wire fences with signs warning of cyanide. You continue on beyond the entrance (forking right) and the road drops down into a wash. Be careful to take note of the distance from the mine entrance and drive about 2.0mi to where the wash broadens and many vehicle tracks head up a branch wash off to the west (32o59.63'N 114o38.05'W). You will need a four-wheel-drive vehicle from this point on - perhaps even immediately to surmount the dirt ridge along the edge of the main dirt road. The rough dirt road heading up the branch wash is well used and is even designated A278 according to the brown road markers you may encounter along the way. Drive west over good dirt road where the only difficulties may be deep gullies washed into the roadbed. After about 2mi the road drops into and proceeds up another sandy wash. Here a branch doubles back to the right and, on the way back, care is needed to avoid continuing the wrong way down the wash. The going in the sand is quite soft as you proceed about 1mi up the wash (it leaves the wash briefly on the left for a short stretch). One branch climbs steeply out of the wash on the right but you continue in the bed for just a short distance where there is a wide area used for camping on the left. You can only continue another 100yds or so up the wash to where a steep dryfall halts further vehicular travel (32o58.71'N 114o40.09'W). Park here.
Hike
Starting the hike at (32o58.71'N 114o40.09'W) at an elevation of about 800ft, you proceed southwards up the bed of the wash, footprints in the gravel bed indicating the passage of others before. After about 0.5mi, at a point (32o58.31'N 114o40.10'W) where the wash becomes quite shallow, watch for the worn use-trail that veers southeast into a tributary wash, and then climbs along the apex of the low ridge that defines the southwest side of that wash. At this point it is wise to look up at the imposing cliffs of Picacho Peak now high above you to the east. Actually, most of what you see are the cliffs of the west side of the lower, western block of Picacho Peak. What is hard to make out from this vantage point is that there is a substantial north-south crack or gully that divides that western block from the higher, main massif of Picacho Peak. Looking closely you should be able to discern the oblique south entrance to this huge crack. The trail up the lateral ridge is steep but relatively easy going; about half way up you should encounter a white vertical plastic tube that acts as a trail marker. Nearing the bottom of the cliffs at the top of this scree slope, the crack becomes self-evident on your left; within it is a steep, rocky chute. When you reach the bottom of the sheer cliffs at an elevation of about 1260ft (about 50min from the start) another use-trail from an alternate approach joins yours and you turn left to approach the chute. The climb up the boulder-filled chute is easy following a well-worn use-trail that stays mostly to the left. The chute ends in a narrow notch, the apex of the gap separating the two massive blocks that make up this mountain. Looking north, it is clearly not possible to reach the notch from the northern side because of steep cliffs below.
 | 
| |
|---|---|---|
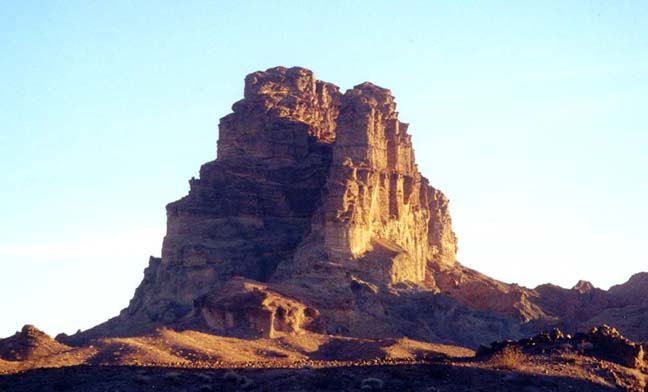
| Picacho Peak from the north | The western cliffs from the starting wash |
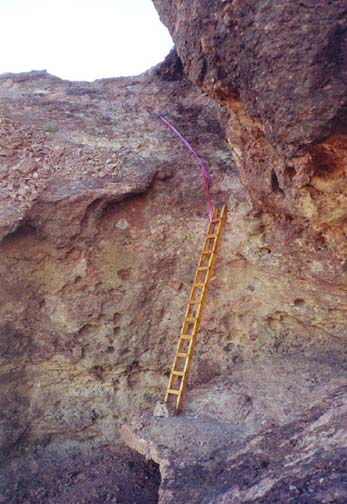
Having rested briefly and donned your harness and helmet, you now proceed to climb to your right (east) zigzagging up several convenient ledges, first to your left, then right through a near-window in the shelf and then back around to the left. These are mostly broad ledges, easily walked without protection and with a well-worn use-trail frequently visible. Helmets are most useful to prevent banging your head on the overhanging rocks. Switch-back again to the right and then to the left. Here, 1hr 20min from the trailhead at an elevation of 1600ft, you should encounter the first significant obstacle, a 12ft step up onto a ledge going north. This step is currently equipped with an aluminium extension ladder, making the ascent trivial. Even without this artificial aid, the step could be quite easily climbed using the hand and foot holds in the depression to the right of the ladder. Just beyond the top of the step is the first real obstacle in the ascent, a gap in the shelf referred to in the Sierra Club annals as the "infamous step-across". The gap or crack is about 18in wide at the rockwall (which it penetrates to a distance of about 6ft), broadens to about 4-5ft and then narrows again near the edge of the shelf. It would be quite easy to pass were it not for the exposure of several hundred feet below the crack. Some have just stepped across at the narrow point near the edge of the shelf, but most make use of the bolts set in the rock on either side to climb down into the crack near the cliff wall, cross over and then step up onto the other side. There are good hand and foot holds for this crossing and we belayed each other across using the bolts on both sides. [P.S. I later heard that these bolts had been removed so you may need to rig some other protection.]
 | 
| |
|---|---|---|
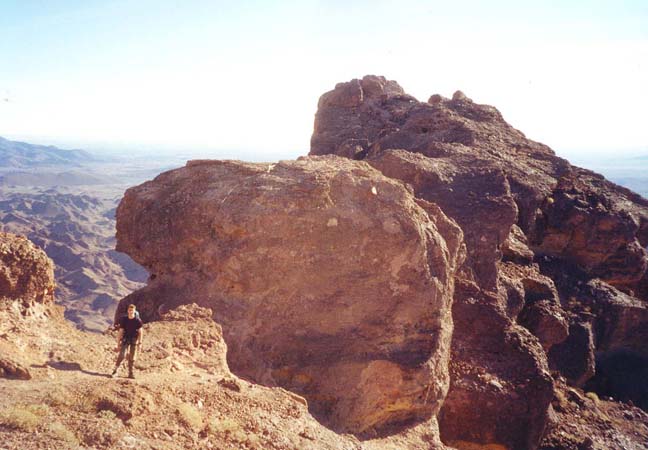
| The ladder near the top | False summit block and summit |
Beyond the step-across, there is more easy shelf walking, first to the north, then zigzagging back up a steeper shelf going south and then back to the north. Now you are almost on the north end of the monolith. On a subsequent north-going ledge you come to a second 12ft step, this one with a little overhang. This too has been fitted with a ladder, presently a home-made wooden job that is strapped to bolt anchors at the top with a piece of webbing. This step could also be climbed to the right of the ladder and then a belay set up for following climbers using the bolts above. But the ladder is quicker.
Once this step has been surmounted, you climb a short ramp to the left that brings you out at the northern end of the ridge-line at the top of Picacho Peak. Climb up the sloping rockface to where you can begin to walk along the ridgeline and follow the use-trail southward. Now you can see the summit, the highpoint at the opposite or south end of the ridge. Halfway there, about 2hr 25min from the start, you encounter perhaps the most difficult obstacle in the whole hike, a false summit block that can be bypassed in one of two ways. The Sierra Club accounts tell of a way in which you can rappel down the east face of the mountain from a sturdy bolted anchor just north of the false summit block. A 30-40ft rappel down that east face will bring you to a shelf with a path that proceeds southward and allows you to walk to the summit through a window under some huge boulders. If you take that route (and I think I would if I climbed Picacho Peak again) then you must leave the rope in place for the climb up on return from the summit. However, we opted for the more common route and free climbed about 15ft to the top of the false summit block using as a belay point the same sturdy anchor that would be used for the rappel on the alternate route. The climb up to the top of the false summit is relatively straightforward except for the exposure and there are two bolts at the top to belay the following climbers. Once on the false summit block, we rappelled 15ft down the other side using two more bolts appropriately placed. It is very important to leave the rope in place here for the return trip. Moreover, since the return climb up onto the false summit block is difficult due to a substantial overhang, it is highly recommended that you install two 5ft etriers to use as footholds while re-ascending. Instead of etriers, we rigged makeshift chains of slings, webbing loops and carabiniers.
From the far side of the false summit block it is a short stroll to the spectacular 1920ft summit of Picacho Peak (32o58.37'N 114o39.84'W). You should reach the top about 3hr after starting out. The view in all directions is breathtaking and the few sights of the cliffs below which you dare to take are awe-inspiring. To the west the flat desert south of the California's Salton Sea. To the northwest, the Chocolate Mountains straggle off into the distance. To the north and east, the last vestiges of the Colorado River meander toward the Sea of Cortez not far away to the south. All around other smaller, vertical monoliths rise up from the barren desert. This is indeed a barren and stark landscape with little rainfall and less vegetation. But that starkness is majestic and the monoliths are awesome. The only blotch on the landscape is the ugly scar of the Picacho Mine below you to the east.
We lunched here on top of the world and entered our names in the register stored in a fancy metal pipe container cemented into the rock. Examining our immediate surroundings we noted a use-trail proceeding down the ridge to the south of us. This led to a shelf with bolted anchors and webbing some 70ft below the summit; presumably an alternate and technically more demanding route up the south side of the monument.
The most demanding obstacle of the whole hike is the 15ft climb back
up the false summit block on the way north along the summit ridge.
We made extensive use of our makeshift etriers to haul ourselves up
above the overhang. Once up, it is a simple rappel down the other
side of the false summit block. Here you can stow the rope since it
is not needed until you get down to the step-across, where we again
belayed each other using the bolts on both sides. Then the rope can be
stowed for good. The descent down to the notch is straightforward
and you should
reach that point about 4hr 45min from the start. Continuing down
the chute and then down the ridge and the wash to the vehicle is easy and
fast and you should be back at your vehicle 5hr 30min after you set
out.
Last updated 1/1/01.
Christopher E. Brennen