ADVENTURE HIKES AND CANYONEERING
IN THE SOUTHWEST
© Christopher Earls Brennen

|
|---|

|
Hike A12. Crystal Canyon
- Hiking time: 6 hours
- Estimated hiking distance: 6.5 miles
- Elevation gain: 700 feet
- USGS Topo Maps: Sontag Mesa (AZ), Bronco Gulch (AZ)
- Difficulties: Two rappels of 40ft and 70ft in heavy water flow with swimming disconnects; a navigational challenge to find the canyon entry point
- Special equipment: Harnesses and rappelling gear with personal belay runner, wetsuit, drybags, carabiners, 160ft rope and 30ft webbing, GPS device
-
ACA Rating: 3C III

Characteristics
Out in the flat mesas of the southwest one often finds that a river has cut a deep canyon through an otherwise featureless landscape but that the presence of that great rift is unseen until one gets very close to the rim. Such is the case with the canyon that the San Carlos River has cut through the flat highlands where the San Carlos Apache Tribe run cattle on their reservation in east central Arizona. This adventure begins with a hike across that flatland to the rim of the canyon and then a steep 400ft descent to the canyon bottom. From there a boulder-hopping hike downstream brings you to a short but exciting technical section known as "Crystal Canyon" because of the large quantity of white crystal laced through the bedrock. The technical section involves challenging rappels in heavy water followed by deep pools and can be done several times if desired. You return the way you came.
Trailhead
This hike is located in the San Carlos Apache Indian Reservation and you must therefore obtain a hiking day permit from the tribe before embarking on it. We obtained our permit on the way to the hike from a gas station/convenience store that is located next door to a Country Kitchen restaurant on the north side of Highway 60 at the east end of the city of Globe. This gas station is just about 200 yards west of the intersection where Highway 60 turns north and Highway 70 heads east. Recreation permits cost $10.00 per person. For additional information contact the San Carlos Apache Tribe, Recreation and Wildlife Department, P.O.Box 97, San Carlos, AZ 85550 or telephone (928)-475-2343 or see the website www.scatrw.com.
Finding the trailhead for this hike is a little challenging so careful navigation and use of a GPS is recommended. From Globe, Arizona, drive east on Highway 70. About 19mi from the Highway 60 turn-off, you will pass the turn-off for the San Carlos Apache tribal town of Peridot and 5.2mi beyond that turn-off you should come to the junction with Route 8 at 33o17.17'N 110o22.20'W that is signposted "Point of Pines Road". Turn left here and drive 11.7mi to a rough dirt turn-off and gate at 33o23.63'N 110o14.42'W. Proceed through the gate and down the dirt road; after 0.2mi make a left turn where you see a large pond on your right, the South Summit Tank. Proceed another 0.8mi along this rough and rutted dirt road to where you make a sharp, right turn at 33o24.20'N 110o15.04'W. Follow this improving dirt road for 2.1mi to its end at 33o25.43'N 110o13.79'W. You should see the large pond known as the Summit Tank off to your right just about 50yds away. Park here in some convenient place in this sparse cholla forest. [Note: If you make a right turn rather than a left at the South Summit Tank you will also reach your destination at the Summit Tank by way of a better road but one that does not appear on the topo map.]
Hike
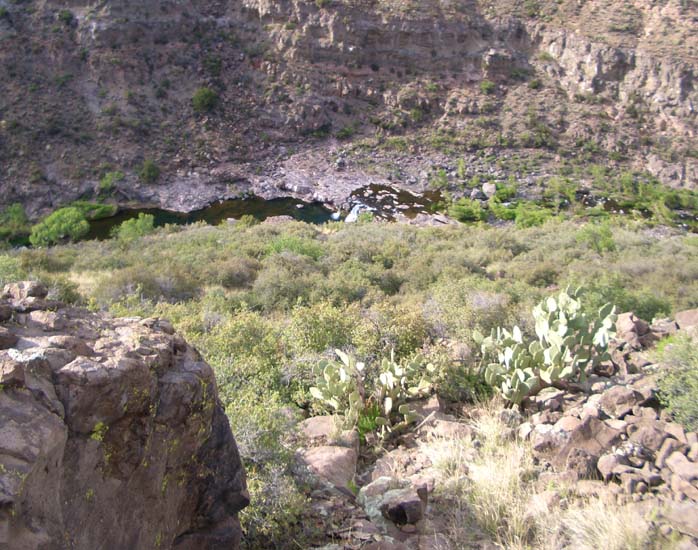
From the slight rise on which you parked (33o25.43'N 110o13.79'W and elevation 4300ft), a flat plain lies before you to the north. Though you cannot see it from this vantage point the canyon of the San Carlos River cuts deeply through this plain a little over a mile to the north. To find the recommended entry point into this steep canyon, the Petroglyph Entry, it is recommended that you use a GPS device to navigate across this featureless flat plain directly to that entry point. The Petroglyph Entry (elevation 4170ft) is at 33o26.08'N 110o15.64'W (WSG84) and lies 2.2mi roughly WNW from your Summit Tank parking place. The hike across this flat plain is easy, the terrain varying between low grass and sparse cholla forest. The canyon comes dramatically into view only when you come within a few hundred yards of its precipitous edge. The uppermost 50ft to 100ft of the canyon wall is almost everywhere vertical. There are only a few places along the sharp rim where it is possible to descend without a rope and therefore considerable care needs to be taken to find the accessible descent route (that also allows ascent at the end of the day!). Viewed from the rim, the Petroglyph Entry is fairly obviously descendable for the first 60ft or so. One location confirmation is the substantial waterfall (about 20ft high) in the canyon bottom almost directly below that point on the rim. In addition, the entry point can be identified by the spiral petroglyph on a rock surface facing you at the most obvious point where you begin the descent. Even if you do not have a GPS it should be possible to find the Petroglyph Entry using these clues if you head directly northwest from the parking area and walk west along the rim until you see the waterfall and then the petroglyph. On the direct approach it should take you 1hr to get to the Petroglyph Entry from the Summit Tank.
 | 
| |
|---|---|---|
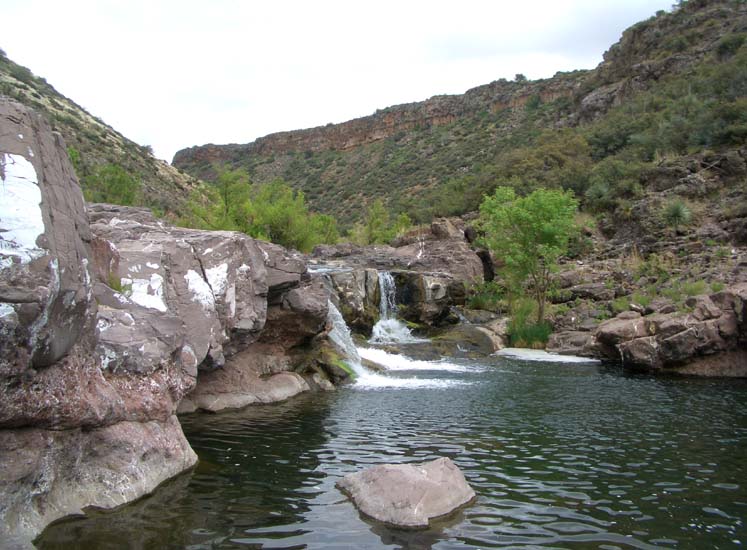
| View from Petroglyph Entry with waterfall below | The 20ft waterfall |
Begin the descent by clambering down about 60ft over boulders and then contouring west along the bottom of the rim cliff for about 100yds. There you should be able to discern a boulder-filled shallow gully that you can descend all the way to the canyon bottom. You should reach the bottom (elevation 3760ft) about 1hr 30min from the start. The waterfall is about 100yds upstream of where you reach the river and is worth a visit for several reasons. On a hot day the pool below it is a beautiful swimming hole. In addition it is worth seeing the crystal-laced rock on the sides of the pool.
[Aside: If you feel you have lots of time you might wish to drop into the canyon further upstream at the Alternate Entry point marked on the map. This way you will see more of the San Carlos River Canyon. The Alternate Entry is a steep boulder-filled gully that begins at 33o26.08'N 110o14.47'W and an elevation of 4200ft and drops down into a small side canyon that is evident on the map. The first part of the descent involves clambering down boulders but about half way down you will need to traverse left over a small shoulder into the next gully and then traverse beyond that to access an inclined ledge that takes you to the bottom. The descent of the side canyon involves climbing around or wading a series of about 8 pools before you emerge into the main San Carlos River Canyon. From the start to the Alternate Entry takes about 35min, the descent to the main canyon about another hour. The subsequent hike down the main canyon to the 20ft waterfall then takes another hour so this alternate route adds approximately 1hr to the day's adventure.]
From the 20ft waterfall it is a straightforward boulder-hopping 40min hike downstream to the short technical section known as Crystal Canyon. Just before you reach this destination, there is an interesting cave and a huge debris woodpile on the left wall that gives some idea of the magnitude of the flash floods that can come through this canyon. The short technical section begins at 33o26.45'N 110o16.22'W and an elevation of 3680ft; you should reach this point about 2hrs 10min after the start. It begins with a short section of rapids that reputedly can be slid and that carry the river down into a large rock enclosure and pool. The exit from this pool is a vertical 20ft waterfall that drops into an even larger pool. If you decide to descend the rapids you are committed to jumping this 20ft waterfall and swimming the larger pool to the exit between this upper technical section and the lower one. However, this upper section is readily bypassed along the shelf on the right if you are not keen on jumping.
 | 
| |
|---|---|---|
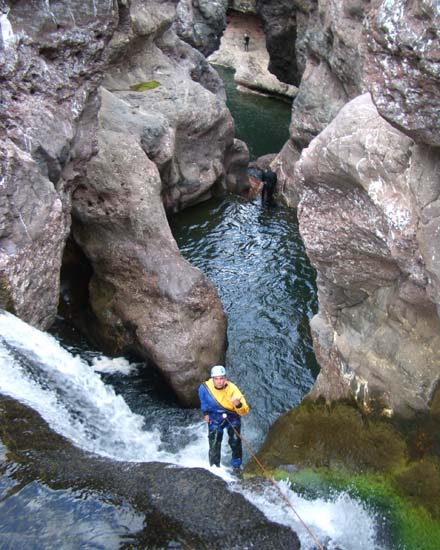
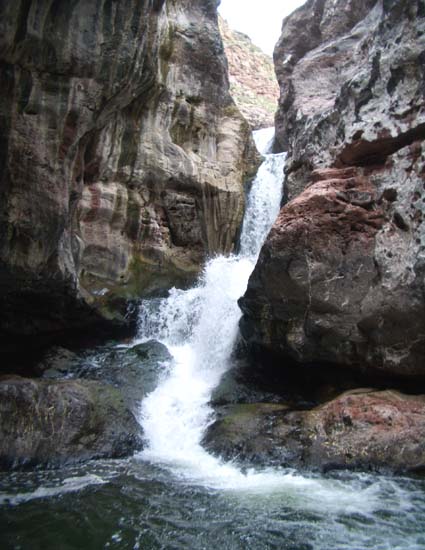
| The first rappel from above | The lower technical section from downstream |
The lower technical section follows almost immediately and is much more dramatic and challenging. You can leave your backpack and gear at the top and take only what you need for the two rappels since you will be returning to this point when the fun is done. Once fully wetsuited, harnessed and helmeted you should also equip yourself with an easily reached belay loop complete with carabiner for the challenge that lies ahead. The descent of the lower section begins with a 40ft vertical rappel down alongside (and perhaps in) a plunging spout to a deep cliff-ringed pool that is readily viewed from the ledge overhead. There is a loose bolt just under the left side of the lip that could be used to anchor this first rappel but ought to be backed up by webbing around the boulder about 20ft back from the lip. You can recover this webbing on your return trip. It is likely that this 40ft rappel will deposit you behind the waterfall on the right side where there is also an underwater ledge that will allow an easy disconnect. Then with your belay carabiner in hand you should swim along the right side of the pool where there are a few slippery underwater ledges that you can use to pause and plan the next move.
The discharge from this pool exits through a narrow, 3ft wide slot and crashes down another 70ft or so into a very large pool at the exit from the technical section. The anchors for this second rappel are two solid bolts in the cliff-face just to the right of the slot discharge. The problem is to climb up and hook your belay line into this anchor that is about 4ft above the water surface when there are only some very slippery underwater ledges to use to elevate yourself while at the same time the current is carrying you toward the lip. Once elevated there is a small and not-so-slippery ledge right at the water surface level that allows a comfortable position from which to deploy the rope for this second rappel. It would be a good idea for the first person descending the first rappel to use the rope from that first rappel as a safety line until secured at this anchor for the second rappel. When secured the first descender can then help secure his/her companions.
Once on rope the second rappel is more challenging than the first for it is harder (or rather almost impossible) to avoid a pounding from the roaring stream. The best you can do is keep close to the right wall and then slide around a corner out of the mainstream about halfway down. The last part is a slide down a gently sloping chute in the raging water and then a swim part-way across the pool to a convenient ledge on the right. Once you have all descended you will swim the last 40yds of the pool to where the slot opens up completely.
This then completes the technical section and you must climb up a scree
slope under an overhanging cliff on the right to access a ledge high
above the lower technical section that allows you to traverse back to
the top of the lower technical section along a rough use trail. Some choose
to go through a second time before heading home. It is likely that you
will spend about 2hrs in the technical section and therefore
start the return trip about 4hrs after the morning start. It will
then take about 40min to hike back to the 20ft waterfall,
30min to climb back to the rim at the Petroglyph Entry and about
50min to hike back to the Summit Tank and your vehicle. Thus the
adventure should take about 6hrs during which you will travel
6.5mi.
Christopher E. Brennen