ADVENTURE HIKES AND CANYONEERING
IN THE SAN GABRIELS
© Christopher Earls Brennen

|
|---|

|
Hike D10. West Muir Ravine
- Hiking time: 10.5 hours
- Estimated hiking distance: 6.8 miles
- Elevation gain: 300 feet
- USGS Topo Maps: Mount Wilson
- Difficulties: About 15 rappels up to 100ft with some serious anchor challenges, substantial downclimbing, some bushwhacking and some swimming
- Special equipment: 200ft rope, 120ft webbing, rappelling gear with at least 14 rappel rings, dry bags
-
ACA Rating: 4B IV

Characteristics
The Muir Ravines are a series of three rugged and precipitous side canyons that descend the southeastern slopes of Muir Peak to meet the lower section of Eaton Canyon. The West Muir Ravine, the subject of this adventure, represents perhaps the most serious canyoneering challenge that the San Gabriel Front Range has to offer. Its descent involves about 12 serious rappels (and, at the end, an additional three more in Eaton Canyon) many of which are part of multi-pitch descents and some of which pose serious anchor challenges. It is a spectacular adventure but only for the experienced canyoneer with good anchor building skills.
It is also a long, tough day, partly because of the number of rappels and partly because of the long approach. The ravine itself is hot and dry but is followed by the cold water swims in Eaton Canyon. Consequently care should be exercised in choosing the right day for the descent. It is best for a cool fall day with sufficient daylight but before the rains have swelled the Eaton Canyon flow. Be sure to carry adequate water for the long, dry approach hike and the descent in the ravine (at least 3 liters) plus a filter for when you reach Eaton Canyon. This is such a long day hike that a small, fast group is recommended; if the group is four or more you should carry two 200ft ropes so that some of the adjacent rappels described below can be done with longer drops but fewer rappel anchors.
Trailhead
The hike requires a long car shuttle. First leave one vehicle near the gate on the Mount Wilson Toll Road (2N45). Drive north or east on Altadena Drive, turn north on Mendocino Lane and immediately east on Pinecrest Drive. You may have to park on Mendocino because of parking restrictions on Pinecrest. But it is still just a short distance along Pinecrest to the Mount Wilson Toll Road gate (34o11.51'N 118o6.33'W and elevation 1300ft). Then drive south again to the 210 Freeway and follow it west to the Angeles Crest Highway. Drive north on the Angeles Crest Highway to Red Box where you turn right onto the Mount Wilson Road and proceed 2.3mi to the overlook at Eaton Saddle (34o14.36'N 118o5.60'W and elevation 5090ft). Park in the broad dirt area.
Hike
Once you pass the metal gate across the Mount Lowe fire road (34o14.36'N 118o5.60'W and elevation 5090ft) you are immediately rewarded by a spectacular view down into the cliff-ringed amphitheater that is the head of Eaton Canyon. Take a moment to enjoy these spectacular surroundings before proceeding up the fire road and through the tunnel, gaining elevation as you approach Markham Saddle and its watertank (elevation 5260ft). Continue along the gently descending fireroad as it rounds the west side of Mount Lowe and reaches the Mount Lowe junction at 4470ft (and 34o13.46'N 118o6.61'W) about 1hr and 3.2mi from the start. At this junction follow the signs for Inspiration Point and hike the gently ascending fireroad for 0.25mi to this popular overlook. Inspiration Point is at 34o13.27'N 118o6.55'W and an elevation of 4500ft. After a brief stop, continue hiking east along the good, level, dirt road that eventually rounds Muir Peak (4688ft) and turns onto the south side of that ridge. After the sharp turn you are contouring around the head of the Middle Muir Ravine. The road ends at a spectacular overlook known as Panorama Point (34o12.85'N 118o6.15'W and an elevation of 4550ft). You should reach this point about 1hr 45min from the start having travelled 4.4mi. Pause here to get your bearings. The prominent ridge directly south of you is the route ahead. Far below you should be able to make out your next waypoint on this ridge namely a long saddle with a prominent rock mass in the middle. This ridge divides the upper east forks of Rubio Canyon on your right from the Muir Ravines on your left.
|
|---|
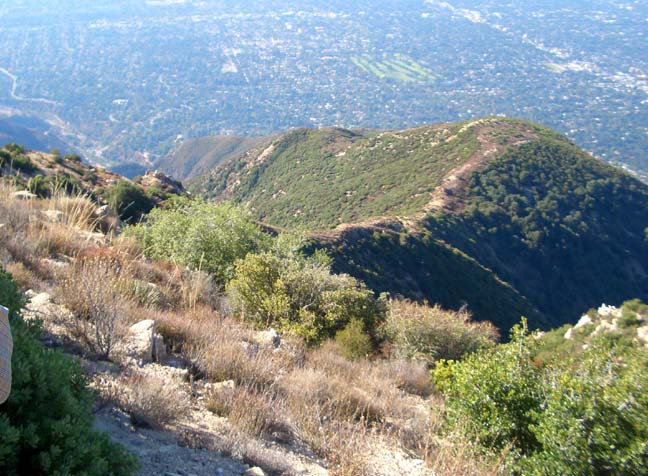
| Looking down the firebreak at Rockmass Saddle |
About 4hrs from the start at an elevation of 2980ft you come to the first substantial rappel, a three step drop anchored by a bush off to the right of the lip. This can be descended either as a single rappel of 90ft or by two rappels of 30ft and 60ft using the tree on the left below the first step. This triple step is followed by many small downclimbs before you arrive at the first big rappelling challenge at 2620ft about 4hr 40min from the start.
 | 
| |
|---|---|---|
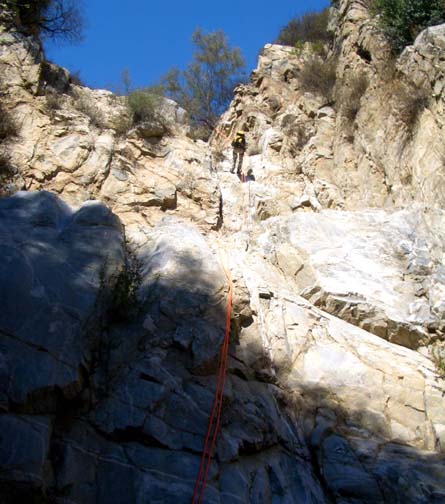
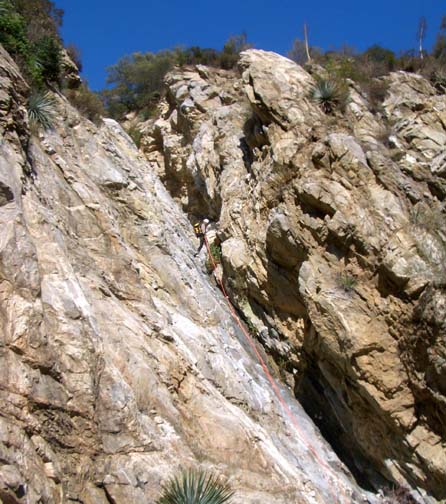
| Start of the first rappel series | Last of second rappel series |
This first big challenge consists of a series of cliff-ringed bedrock steps with a turn that obscures a view of the bottom. Done in two stages, the descent first involves a 100ft rappel down two vertical steps using a bush anchor on the right side of the lip. This drops you onto a modest rock and gravel platform where there is with a deadman anchor (it may need to be rebuilt) which is used for the second 70ft rappel to the bottom. This is followed by a number of small downclimbs in this steeply descending lower section of the ravine.
It is not far to the top of the second major multistep drop requiring two successive rappels. You should reach this elevation of 2340ft about 6hrs from the morning start. First you descend 100ft down several steps using as anchor a bush high up on the right side. This descends into a narrow perch in an inclined slot behind a large boulder. Then a second 90ft rappel from an anchor around the big boulder takes you down the inclined slot to a broad platform above several downclimbs. These are immediately followed by the first of three individual vertical drops of about 50ft; this first one is anchored by a bush high on the right side. A second, separate 50ft rappel is just a short distance downstream and this one is anchored by a bush on the left side. Yet another single rappel of 40ft follows shortly but this had no easy anchor and required the construction of a deadman anchor in the streambed just a short distance from the lip. You should reach the 1970ft elevation of the top of this third single rappel about 8hrs after the morning start.
The close proximity of Eaton Canyon will have been evident for some time but you now arrive at the top of the series of four rappels that will finally deposit you beside the stream in Eaton Canyon. Just a short distance downstream of the last single rappel and at an elevation of 1930ft, you will arrive at the top of another two-pitch drop where the second rappel is out of sight around a right hand bend. The first stage is a 50ft rappel from a bush anchor on the left down a deep, awkward slot to a narrow rocky platform at the right hand bend. Beyond the bend is the second rappel, a 40ft drop from a webbing anchor around a wedged rock on the left side of the lip. This is almost immediately followed by the last two rappels. First another deadman anchor in midcanyon is used for a 40ft rappel down to a broad shelf at the top of the last rappel in West Muir Ravine. Once on the broad shelf, go to the next lip overlooking Eaton Canyon and look for a big blue rock wedged on the left side behind a rock promontory. This is used to anchor the 90ft rappel down into the base of Eaton Canyon. Once down to the river in Eaton Canyon, the stream provides a welcome cooldown and cool drink after the efforts in the lower section of the West Muir Ravine. You should reach this confluence at 34o11.97'N 118o6.11'W and an elevation of 1680ft about 8hrs 40min from the morning start having covered 5.7mi.
The confluence is about 30yds upsteam of the small 15ft rappel in Eaton Canyon (it is also just a few hundred yards downstream of the small dam) and the descent from this point is covered in the Lower Eaton Canyon hike. The anchor for the 15ft rappel is a stout tree on the right but the entry to this rappel is very awkward because of the overhang. Moreover the pool at the bottom is often deep and must be swum. Another small waterfall with a large deep pool follows immediately. At present this can be bypassed by walking along a very large log that spans the falls and the pool on the right. But when this log floats away you will have to swim this pool.
There follows another section of wooded canyon before you arrive at the penultimate waterfall, a 50ft vertical drop from a narrow rock slot. Here there are several routes of descent. If you climb the steep slope on the right you will find a use-trail that easily bypasses the falls. Alternatively, on a hot day, it is a fun, wet rappel into a deep pool though you need to be prepared to rappel while in the main water stream. For an anchor, wrap one of the large rocks a short distance upstream of the lip. It is just possible to avoid the main stream by careful route selection on the right (as you look downstream). But the pool at the bottom usually must be swum whatever rappel route you use. Finally we note that many young people choose to slide down these falls, the little chute at the top projecting them into a free fall to the deep pool below. Downstream of this waterfall, there is another wooded section before you finally arrive at the top of the 60ft Eaton Falls. Currently there is a two bolt anchor on the left wall that can be used for this rappel. Like the penultimate falls this is a very wet descent in the main stream. The entry on the left is quite dry but it then becomes very difficult to avoid an encounter with the main falls. Near the bottom you can veer to the right before dropping into the pool at the base that often requires swimming. You are likely to have a sizeable audience for this descent of Eaton Falls for it is a favorite picnic spot.
Downstream of Eaton Falls to the entrance of Eaton Canyon is an easy hike of about 0.5mi. With a final short haul up to the Mount Wilson Toll Road from under the bridge and then up the road to the gated entrance to the Toll Road (34o11.51'N 118o6.33'W and elevation 1300ft) you will come to the conclusion of this challenging adventure about 10hrs 30min from the morning start having covered about 6.8mi.
Last updated 10/17/06.
Christopher E. Brennen