ADVENTURE HIKES AND CANYONEERING
IN THE SAN GABRIELS
© Christopher Earls Brennen

|
|---|

|
Hike D14. Little Santa Anita Canyon
- Hiking time: 6 hours
- Estimated hiking distance: 4 miles
- Elevation gain: 1000 feet
- USGS Topo Maps: Mount Wilson
- Difficulties: About 8 rappels ranging in height from 15ft to 40ft
- Special equipment: Rapelling equipment with a 120ft rope, 100ft of webbing, 8 rappel rings and dry bags.
-
ACA Rating: 3C III

Characteristics
This hike begins in the foothill community of Sierra Madre and proceeds up the historic Mount Wilson Trail to the point known as First Water. There the hiker first reaches the waters of the stream that runs, year long, down the beautiful Little Santa Anita Canyon. In ancient times, the Gabrieleno Indians used this trail to access the San Gabriel mountains and even the desert beyond. Later it was improved by Don Benito Wilson in a futile attempt to harvest the timber high up on the slopes of the mountain that now bears his name. Still later, the first telescope to explore the heavens from the summit of Mount Wilson was dragged up this trail, a task that took some thirty days. Since then countless thousands of hikers have followed the Mount Wilson trail into the verdant depths of Little Santa Anita Canyon and on up to Mount Wilson. Each year many runners participate in the annual trail race that begins in Sierra Madre and turns around at Orchard Camp. But few have ventured down the canyon itself to witness the many waterfalls that adorn the route you will take.
Indeed, the hike up to First Water is just the start of this challenging adventure in which you descend Little Santa Anita Canyon, along the way negotiating about a dozen waterfalls, at least eight of which require a rappel. The highest is only about 40ft tall but several are quite challenging because of the flowing water and their unusual geometry. It is a good hike for a summer day since you will be wet most of the way. However, it is an attractive, wooded canyon thanks to the year-long water and there is good shade from the summer sun.
This is one of the San Gabriel canyons in which bolts were installed at every rappel sometime during 2003-4. Almost all of these bolts are unnecessary and were installed for their convenience by commercial guides. Moreover, they are single bolts rather than twin bolts. In this account I try to describe alternative natural anchors for those that prefer to use them.
Trailhead
To reach the trailhead, drive north through Sierra Madre on Baldwin Avenue. Turn right on Mira Monte just before Baldwin ends and drive about 200yds to where the road labelled Mount Wilson Trail turns left. Park near this intersection (34o10.17'N 118o2.95'W and elevation 960ft) and walk about 100yds up the Mount Wilson Trail Road to where the trail itself branches off on the left.
Hike
Follow the Mount Wilson Trail as it climbs up and into Little Santa Anita Canyon. After about a mile, the dam at the entrance to the canyon will become visible below you and, shortly thereafter at 34o10.61'N 118o2.70'W and an elevation of 1550ft the trail crosses over the top of a prominent ridge that juts out to the east below the trail and clearly ends at a canyon bend just north of the dam. It is important to identify this ridge for this is the way that you will exit the canyon if you choose to take the first exit (see below). Specifically, this first exit involves climbing out of the canyon, up the side of this ridge at a point on the north side of the ridge about 2/3 of the way along it. It is a steep but safe climb provided you identify the correct route. Consequently you should try to pick out some landmarks that might be visible from the canyon bottom. At the time of writing, there is a prominent blackened and burnt stump of a tree evident on the north slope of the ridge. The climbing route is in a gully downstream of this stump.
 | 
| |
|---|---|---|
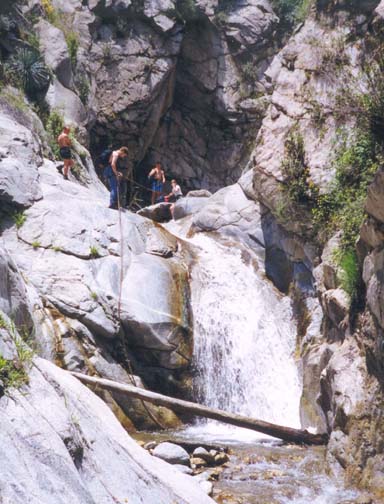
| Above the second rappel | Clancy and fourth rappel |
Having reconnoitred the exit ridge, you now proceed up the trail for about another mile. As it climbs, you will get several views of the canyon bottom below and its many waterfalls. The canyon wall is so steep that there are only a few places where it is possible to climb from the bottom up to the trail but you may wish to take note of these in case of emergencies.
Finally you will arrive at the trail fork that marks your imminent arrival at First Water. Taking the right fork, it is but a few yards down to the river at First Water (34o11.01'N 118o2.76'W and elevation 1920ft). Especially on a hot summer day you may wish to pause here in this shady grove and prepare yourself for the wet descent down the canyon for, almost immediately, you will need to wade.
From First Water, the canyon turns back and forth a few times and you must negotiate a series of small waterfalls, either by wading or by circumventing them on the left. Soon you arrive at the first large waterfall, the 40ft drop that can be seen from the old trail just before First Water. There is a bolt anchor in the left rock face at the top of these falls that may be used as the back-up anchor for this first rappel. It is best to try to rappel to the left of the waterfall.
The second, 35ft rappel follows almost immediately. There are several natural anchors including trees and some large boulders but the single bolt anchor is off to the right side. Descending from the natural anchors it is a little difficult to stay out of the water. Some 30yards downstream is a more interesting challenge, particularly when there is a substantial amount of water running in the canyon. Scrambling down a steep slope and wading a short distance through the stream you come to the top of a narrow and slippery chute about 20ft long. This is called ``The Spout'' because, at the bottom, the chute makes an abrupt right turn sending a jet of water flying off to hit the right wall of the canyon. At low water it may well be possible to proceed straight down the chute. The bolt anchor is on the left side of the lip and one can readily descend the upper section by straddling the stream. However, when you get down to the spout you must execute a lunge manoever over to the left of the jet in order to avoid being caught in this maelstrom. Moreover, at the bottom the pool may represent a deep wade, in which you pass under a huge chockstone. In heavy water, the ``Spout'' is a substantial challenge that is only for the experienced canyoneer. However, in dry and hot conditions it can provide some fine fun.
Emerging from under the boulder, it is but a few yards to the top of the next waterfall, a flat vertical drop of about 45ft. There are several trees at the top that provide excellent anchors in addition to the bolt anchor on the left. It may appear as though you should rappel down on the left in order to avoid a shower but, in fact, it is better on the right and you should use the tree furthest to the right for your natural anchor. This rappel is simple but quite slippery.
Just a few yards downstream is a 45ft waterfall that is a steep and awkward chute. At times in the past it was difficult to find a satisfactory natural anchor for a rappel in the vicinity of the falls. Most recently, however, a number of fallen trees are available as well as the bolt anchor in the right wall.
About 30yds further downstream is a cascade that is negotiated by an easy downclimb on the right, at least at low water. Shortly thereafter, as the canyon narrows and makes a right turn, you reach the fifth (or sixth) rappel, a 25ft waterfall into a sculptured chasm. As you look further downstream you may anticipate another obstacle with little sign of an anchor but it will turn out to be easily downclimbed. Hence you need only worry about the immediate waterfall. If there is little water then you may choose to rappel down through the waterfall using the large tree that is in the upstream center or the bolt anchor on the right side. Otherwise, it is preferable to locate the rock projection under the right hand wall that can be used as an anchor to rappel down on the right hand side.
The small waterfall that follows immediately can be downclimbed most easily from the shelf on the left and, 30yds further on you arrive at the next rappel, a 25ft waterfall to the left of a very large boulder just behind which there is a substantial tree. As a natural anchor you can use either this tree or a large rock horn on the right side of the lip. These will take you down to a knee-deep pool; it is wise to continue your rappel through this pool and over the small 4ft drop below it.
|
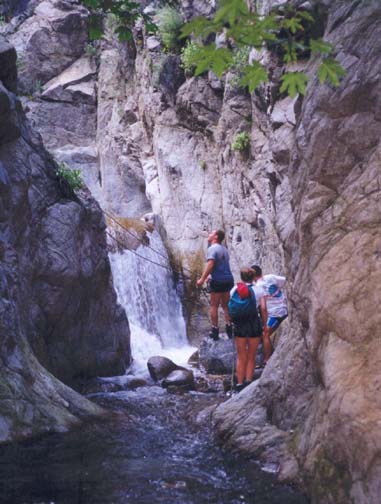
|---|
| The rappel before the first exit |
A small waterfall just a few yards further on can be readily downclimbed on the right. There follows a broader and gentler stretch of canyon about 200yards long. This ends with a modest two step waterfall formed by several huge boulders with the falls along the right wall. The upper step is easily descended; the lower step can also be free climbed but, if you choose to rappel as I did, the medium-sized boulder in the middle of the stream at the top makes a convenient natural anchor. There is also a bolt anchor in the right wall. I call this Curtain Falls since, in high water, the flow covers the entire width of the lip and creates a broad curtain waterfall with a space behind it. Downstream of Curtain Falls, the canyon is very narrow and, after several small waterfalls you will arrive at a rocky cascade consisting of a chute, a moderately deep pool and an awkward 10ft waterfall. The last requires a rappel for the waterfall is vertical and the rock is polished smooth. The only available natural anchor is a small but solid tree about 10ft above the lip of the falls on the right. The climb to this tree is a little exposed but quite straightforward and, once you reach it, the rappel is easy. Alternatively there is a bolt anchor on the right side
Downstream of this rappel the canyon remains narrow and the going is slow as you negotiate a series of minor chutes and cascades. About 30yards beyond the 10ft rappel, the canyon executes an abrupt left turn and, this signifies the fact that you are now on the north side of the exit ridge mentioned at the start of this hike. The first exit route is about 100yards beyond the abrupt left turn at about 34o10.69'N 118o2.59'W and an elevation of 1380ft. It is the first place on the right wall where climbing seems practical and safe. Extensive recent use has made this trail quite evident; you proceed up a small steep and earthy wash, moreover, it is currently marked by a round rock cairn. You climb a short way to your left and then proceed straight up a steep gully to the top of the ridge. From there, it is a straightforward matter to hike along the top of the bushy ridge to the point where it joins the Mount Wilson Trail. It is then all downhill as you retrace your steps back to the trailhead (34o10.17'N 118o2.95'W and elevation 960ft).
Alternative Exit:
Alternatively you can proceed all the way down the canyon to Sierra Madre
Dam. Just downstream of the first exit, there is a 10ft rappel from
a bolt anchor in the right wall that drops you down into a deep pool. Here
the canyon narrows even more and there are a series of deep pools some of
which may require swimming. Several more pools follow before you arrive at
the top of a 25ft rappel from a bolt in the left wall. This is perhaps
the narrowest and most slot-like section of the whole canyon and the chute of
this rappel drops down into a small but very deep pool surrounded by
vertical rock walls where you must swim
to the next lip about 15ft away. Pull the rope from this lip and then
downclimb the 5ft drop on the far side of the lip. A few yards
further down the slot the final 10ft rappel drops down into another
swimming pool. Beyond this pool the canyon broadens and it is about
400yds of boulder hopping before you come to the back of the normally
empty Sierra Madre dam. A dirt road on the right
(34o10.60'N 118o2.56'W and
elevation 1170ft) takes you up and over the
dam to the back of a barbed-wire topped gate. There is a place on the right
side of the gate where you can climb over with relative ease. Further down
the dam access road is another bar gate that leads to a triple fork in the
small canyon roads that wind through a residential section of hillside.
Take the left fork and thereafter turn right as you make you way through
the maze of small roads eventually meeting Churchill Road where you turn right
and soon come to the intersection of Mountain Trail and Mira Monte.
Your starting point, namely Mount Wilson Trail Road is just a few yards up Mira Monte from
this intersection.
This alternative adds about one hour to the hike duration.
Last updated 2/15/05.
Christopher E. Brennen