ADVENTURE HIKES AND CANYONEERING
IN THE SAN GABRIELS
© Christopher Earls Brennen

|
|---|

|
Hike D6. East Fork of Rubio Canyon
- Hiking time: 9 hours
- Estimated hiking distance: 6.1 miles
- Elevation gain: None
- USGS Topo Maps: Mount Wilson
- Difficulties: 18 rappels up to 150ft with one serious anchor challenge
- Special equipment: Two 200ft ropes, 150ft webbing, rappelling gear with at least 10 rappel rings, dry bags
-
ACA Rating: 4B IV

Characteristics
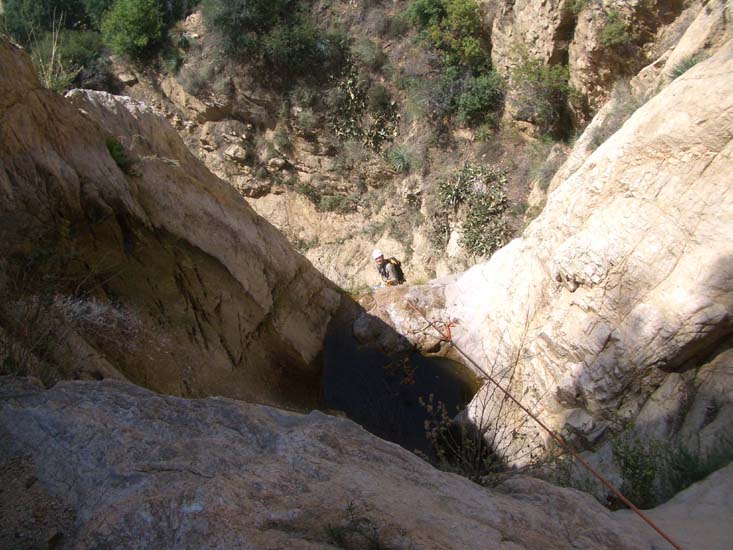
The main Rubio Canyon descent described in another chapter constitutes one of the classic canyoneering adventures in the San Gabriel mountains. The seven rappels are all now equipped with good double-bolt anchors that make that descent easier and faster. For the experienced canyoneer, a different adventure in this same canyon is to descend the East Fork of Rubio which joins the main canyon just upstream of Diana's Bath and those rappels. This East Fork adventure includes a descent of the spectacular Leontine Falls located a short way above the confluence. Leontine Falls also constitute a serious anchor challenge discussed below in more detail.
The adventure described here descends the full length of the East Fork of Rubio Canyon, the top being accessed from Panorama Point at the end of the fire road spur that runs east from Inspiration Point. The descent involves 11 rappels in the East Fork plus the 7 in the main canyon. This makes for a long, tough day, partly because of the number of rappels and partly because of the long approach to Panorama Point. A small, fast group is therefore recommended. Be sure to carry adequate water for the long approach hike and the canyon descent (at least 3 liters) plus a filter for when you reach the spring. The hike is probably best for a spring or fall day, but not after prolonged rain.
Trailhead
This hike requires a long car shuttle. First park your vehicles at the Rubio Canyon trailhead. To reach this drive up Lake Avenue and, near the top, turn right onto Delores Drive. Turn left onto Maiden Lane and then right onto Rubio Canyon Road. Follow Rubio Canyon Road as it winds northeast; just before the bridge over Rubio creek, turn left on Rubio Crest and then right on Rubio Vista. At the top of Rubio Vista the road turns left and becomes Pleasantridge. Leave the return vehicle(s) at this corner (34o12.18'N 118o7.38'W and elevation 1820ft) where the Rubio trailhead is located.
Then retrace your route to Lake Avenue, drive south to the 210 Freeway and follow it west to the Angeles Crest Highway. Drive north on the Angeles Crest Highway to Red Box where you turn right onto the Mount Wilson Road and proceed 2.3mi to the overlook at Eaton Saddle (34o14.36'N 118o5.60'W and elevation 5090ft). Park here in the broad dirt area near the metal gate across the fire road.
Hike
Once you pass the metal gate across the Mount Lowe fire road (34o14.36'N 118o5.60'W and elevation 5090ft) you are immediately rewarded by a spectacular view down into the cliff-ringed amphitheater that is the head of Eaton Canyon. Take a moment to enjoy these fabulous surroundings before proceeding up the fire road and through the tunnel, gaining elevation as you approach Markham Saddle and its watertank (elevation 5260ft). Continue along the gently descending fireroad as it rounds the west side of Mount Lowe and reaches the Mount Lowe junction at 4470ft (and 34o13.46'N 118o6.61'W) about 1hr and 3.2mi from the start. At this junction follow the signs for Inspiration Point and hike the gently ascending fireroad for 0.25mi to this popular overlook. Inspiration Point is at 34o13.27'N 118o6.55'W and an elevation of 4500ft. After a brief stop, continue hiking east along the good, level, dirt road that eventually rounds Muir Peak (4688ft) and turns onto the south side of that ridge. After the sharp turn you are contouring around the head of the Middle Muir Ravine. The road ends at a spectacular overlook known as Panorama Point (34o12.85'N 118o6.15'W and an elevation of 4550ft). You should reach this point about 1hr 45min from the start having travelled 4.4mi. Pause here to get your bearings.
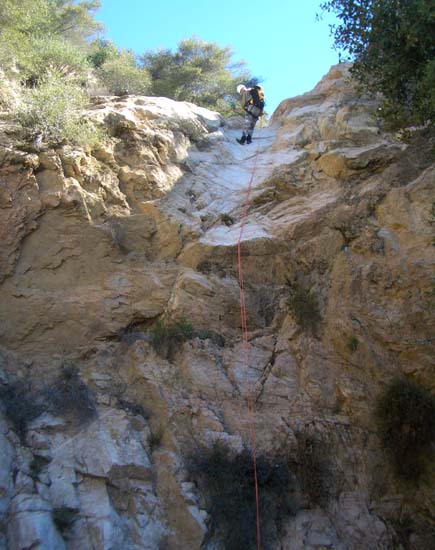 | 
| |
|---|---|---|
| Second rappel in East Fork of Rubio | Descending Leontine Falls |
Begin the drop-in on the west side of the Panorama Point roads-end clearing. Drop steeply down an earthen slope following an animal use-trail that winds between the patches of bushes and leads down into the start of a gully with a steep cliff on your right. As you begin the descent of the gully some minor bushwhacking is needed before the gully clears and deepens. There are a couple of easy whiterock downclimbs until, 45min from the drop-in at 3890ft, you arrive at the top of the first rappel. This is a two-step, 90ft drop anchored by a stout bush on the left. It descends down into a narrow slot. Just a short distance downstream this slot joins a large steep wash that has clearly experienced a recent major debris flow and is probably located just below the large triangular scar in the top of the East Fork that can be seen from the valley far below.
This larger gully descends steeply and it is only a short distance downstream to the top of the second rappel which you should reach at 3710ft about 1hr 30min from the drop-in. Anchored by a bush on the right, this steep second rappel descends about 80ft of clean, white rock. This is immediately followed by a 90ft rappel anchored by a bush on the left that descends past a small hanging recess down into a narrow gully going right where another canyon comes in on the left. Another brief hike leads to an awkward 10ft downclimb where a partner assist is needed and then to a 20ft rappel from a boulder anchor on the left. You should reach this small rappel at 3480ft about 2hrs 10min from Panorama Point or 3hrs 50min from the morning start.
Just beyond this small rappel, the character of the canyon changes radically because a spring here creates a small water flow throughout the year and causes much more luxurious growth. The flowing water will allow you to replenish your water supply. This same location saw the crash of an AT6 fighter-trainer aircraft in June 1941 and the death of its two crewmen. Some pieces of the plane can still be found in this part of the canyon.
Not far downstream from the spring at an elevation of about 3290ft, you arrive at the top of a 70ft sloping rappel down through a slot. The problem here is a lack of a nearby anchor; using a tree high on the left bank some distance upstream means you will need a doubled 200ft rope to descend. Another short hike brings you to the top of a series of rappels beginning at 3190ft. The first of these is a 70ft multistep rappel from a bush anchor in the approach slot just upstream of the lip. This is immediately followed by a 50ft rappel from a tree anchor up a slope on the left (do not anchor from the big dead tree in the middle). At the bottom of this rappel the canyon turns sharp left and begins a long sloping and stepped descent down bedrock that is wet and slippery in places. Though you can downclimb some way, it is probably best to use the large hidden tree on the left to rappel down about <150ft to where you can resume safer downclimbing. You should reach this location at 3050ft about 3hrs 40min from the drop-in at Panorama Point.
Below the long sloping rappel there is a small 30ft rappel from a bush anchor on the right followed by a scrubby section with lots of ground plants. Here you begin to find the pipes of the water company. After some mild bushwhacking you will finally arrive at the top of the series of steps that lead to the majestic Leontine Falls, the most serious technical challenge in this canyon. You will arrive at the first of these steps, or Leontine precursors, at an elevation of 2760ft about 4hrs 50min from Panorama Point.
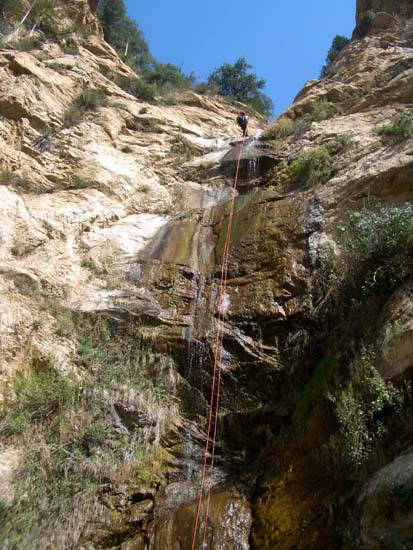 | 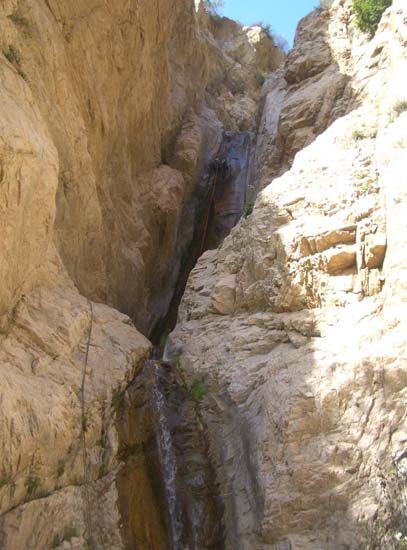
| |
|---|---|---|
| Leontine Falls | Thalehaha and Roaring Rift Falls |
The first Leontine precursor is a small 15ft drop that is most readily bypassed by climbing up behind a large tree on the left and then descending. The second precursor is a easy downclimb via the bedrock in the streamcourse. The third precursor is a 25ft vertical rappel using a small bush on the left or the boulder wrap discussed below. However, before descending the second (or third) precursor note the large wedged boulder halfway down the small waterfall in the second precursor. This is the only really solid natural anchor available for Leontine itself but it requires a very long peice of webbing (about 50ft) from that boulder to the lip of Leontine described below. This is one solution to the anchor problem. Another would be to roll some boulders down the first three precursors in order to construct a deadman anchor for Leontine. But the ledge after the third precursor is also one of the few places in the San Gabriels where a good double bolt anchor would be merited.
After the third precursor you arrive at the top of the main Leontine Falls, a spectacular 130ft vertical drop from this ledge that is recessed so that you cannot see the bottom from here. Some canyoneers have rappelled down a ``fourth precursor'' of about 30ft to a small hanging pothole where there is a single, dubious bolt anchor. However the full 130ft drop from the ledge after the third precursor is strongly recommended and provides an easier rappeling exit from the hanging pothole. Below the pothole Leontine is a dramatic vertical descent that is usually wet and slippery. In times of heavier flow this descent could be very challenging for it would be hard to avoid descending in a torrent of water.
Below Leontine Falls there are two modest downclimbing challenges, the first of which traverses a ledge on the right and the second of which may require a partner assist. Just below the second you arrive at the junction with the main channel of Rubio Canyon. You should reach this milestone at 34o12.56'N 118o6.88'W and an elevation of 2480ft about 5hrs 50min after the drop-in at Panorama Point or 7hrs from the morning start having covered a total distance of 5.3mi.
The descent of Rubio Canyon downstream of the confluence has been
described in the chapter on Rubio Canyon and will not be repeated here.
A group for whom the East Fork descent is appropriate should not have
any great difficulty with the seven rappels in the main canyon and should be
able to reach the trailhead about 1hr 40min after the confluence.
The trailhead is located at
34o12.18'N 118o7.38'W and an
elevation of 1820ft. The complete hike is just 6.1mi and
should take about 9hrs.
Last updated 13/17/07.
Christopher E. Brennen